Texas
Jordan Myers
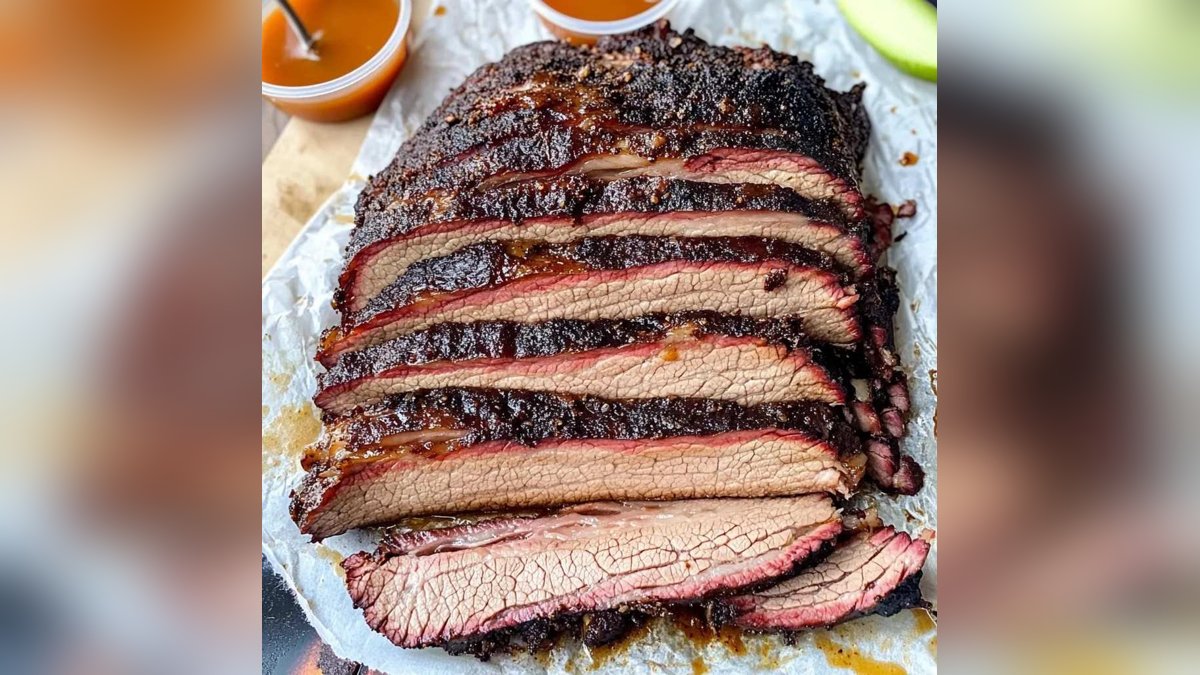
1. Selecting the Perfect Brisket: Prime Grade and Marbling
The foundation of any great Texas-style brisket starts at the meat counter. For authentic results, you need a whole packer brisket--meaning the point and the flat are still attached. This cut typically weighs between 12 and 16 pounds and provides the fat cap and intramuscular marbling essential for moisture during the long cook.
Look for USDA Prime grade brisket whenever possible. Prime grade has abundant marbling--those thin white streaks of fat running through the muscle--which renders slowly and keeps the meat juicy. Choice grade can work but requires more careful temperature management and often yields a drier flat. Wagyu brisket, while expensive, offers exceptional fat content and a buttery texture that many pitmasters prize.
Before buying, inspect the brisket in person. The fat cap should be at least ¼-inch thick, ideally ½-inch, and feel firm but pliable. Avoid briskets with excessive hard fat or yellowing, which indicates age. A fresh brisket should smell clean and beefy, not sour or metallic. If ordering online, choose a reputable butcher that ships vacuum-sealed, flash-frozen briskets to ensure quality.
Pro tip: A USDA Prime brisket typically costs $4-$6 per pound at retail, but the extra marbling reduces the risk of a dry flat and delivers a more forgiving cook for beginners.
2. Trimming and Seasoning: The Art of the Bark
Trimming is not optional--it's a critical step that separates amateur from pro. Start by removing the hard fat from the top of the fat cap, leaving a uniform ¼-inch layer. Flip the brisket over and trim the silver skin and any loose connective tissue from the meat side. Square off the edges to prevent thin pieces from burning during the long smoke.
For seasoning, Texas purists stick to a simple blend of coarse black pepper and kosher salt in a 2:1 ratio by volume. This classic rub, often called the Dalmatian rub, creates a dark, peppery bark that complements the beef without overpowering it. Some pitmasters add garlic powder or paprika, but the hallmark of Texas brisket is that the beef flavor remains front and center.
Apply the rub generously--about 1 tablespoon per pound of meat--and pat it into the surface. Let the seasoned brisket rest uncovered in the refrigerator for at least 8 hours, or overnight. This dry brine allows the salt to penetrate the meat, improving flavor and moisture retention. For best results, pull the brisket from the fridge 45 minutes before smoking to take the chill off.
3. Setting Up the Smoker: Temperature, Wood, and Humidity
Texas-style brisket demands a consistent cooking temperature between 225°F and 250°F. Any lower and the cook time becomes excessive; any higher and the meat may tighten up and dry out. Use a reliable smoker--offset smokers, pellet grills, and kamado-style cookers all work well--but the key is maintaining steady heat without wild swings.
Wood choice matters immensely. Post oak is the traditional Texas wood, prized for its mild, smoky flavor that doesn't overpower the beef. Hickory works as a substitute but use sparingly--it can turn bitter. Fruit woods like apple or cherry add sweetness but stray from authentic Texas style. Aim for clean, thin blue smoke, not thick white smoke, which can impart a creosote taste.
Humidity inside the smoker plays a role in bark formation and moisture. A water pan placed beneath the brisket helps regulate temperature and adds steam, preventing the surface from drying out too quickly. Some pitmasters spritz the brisket every hour with a mixture of apple cider vinegar and water to keep the bark moist during the stall phase.
4. The Stall and the Wrap: Navigating the Plateau
Every brisket hits the stall--a period where internal temperature plateaus around 150°F to 170°F for hours. This happens because evaporative cooling from moisture escaping the meat counteracts the heat. The stall can last 2 to 4 hours, testing your patience. Do not raise the smoker temperature to push through; that will dry out the meat.
Wrapping the brisket in pink butcher paper (not foil) is the standard Texas technique. Butcher paper breathes, allowing some moisture to escape while protecting the bark from becoming soggy. Wrap when the bark looks set and the internal temperature reaches about 165°F. Foil, by contrast, traps steam and softens the bark--acceptable for competition but not traditional Texas style.
After wrapping, continue cooking until the internal temperature hits 203°F to 205°F in the thickest part of the flat. At this point, the collagen has fully broken down into gelatin, giving the brisket its signature tender, almost buttery texture. Use a probe thermometer to check tenderness: it should slide in with little resistance, like room-temperature butter.
5. Resting and Slicing: The Final Critical Steps
Resting is non-negotiable. A properly rested brisket retains juices that would otherwise run out onto the cutting board. Wrap the cooked brisket in a fresh layer of butcher paper, then wrap in a towel and place in a dry cooler (no ice) for at least 1 hour, ideally 2 to 4 hours. This allows the internal temperature to drop slowly while the juices redistribute.
When slicing, separate the point from the flat by cutting along the natural fat seam. Slice the flat against the grain into pencil-thick slices--about ¼-inch. The point, which is more marbled, can be sliced thicker or chopped for burnt ends. Always slice only as much as you plan to serve immediately; leftover brisket holds better in whole pieces.
Serve with classic Texas sides: white bread, pickles, onions, and a simple sauce on the side. The best brisket needs no sauce--the smoke, bark, and beef speak for themselves. Store leftovers in vacuum-sealed bags or tightly wrapped in butcher paper in the refrigerator for up to 5 days, or freeze for up to 3 months.